
Looking for help?
Find answers to your questions
-
Installing Your System
- Downloading the Mobile App
- Unboxing Your System
- Connecting To WiFi
- Welcome Letter
- Adding Sensors
- Understanding Zone Types
- Testing Your System
- Adding Smart Home Devices
- Adding Video Devices
- Managing User Codes
- How Do I Set Up Rules, Scenes, and Schedules?
- Managing Notifications
- Rebooting the Interactive Panel
- Creating System Event Notifications
- Interactive Touchscreen Overview
- How to Arm and Disarm Your System
- Arming Modes and Options
- How Do I Cancel An Alarm?
- Panic Buttons
- Geo-Services
- Bluetooth Touchless Disarming
- Two Factor Authentication
- Deleting A Device
- How to change or reset password
- Highlights
- Mobile App vs Web Portal Experience
- Alarm.com Knowledgebase
- Video Analytics
- Video Ground Zones and Trip Wires
- Video Recording and Rules Notifications
- Viewing Saved Video
- Streaming Live Video to the Touchscreen
- Video Cloud Storage
Two Factor Authentication
Two Factor Authentication is an optional security measure for an account that requires the entry of an additional code, received as an SMS text message or email, after logging into an account with a login name and password. The code can also be generated using an authenticator app.
Note: It is recommended to create separate logins for additional users as Two Factor Authentication associates a username with a specific phone number or email address.
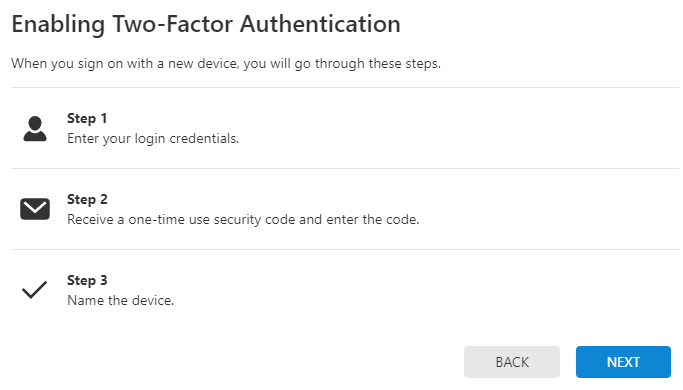
When Two Factor Authentication is activated:
- Upon login to the app or website, a text message or email containing a randomly generated code is sent to a specified recipient. A code can also be generated using an authentication app. From there, the code is necessary to log in. The following are example codes that can be sent.
Text message:
Email: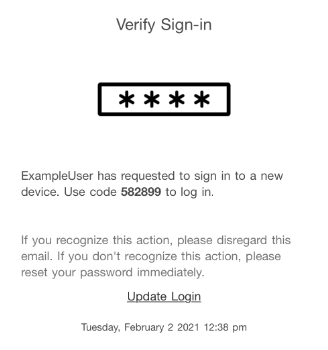
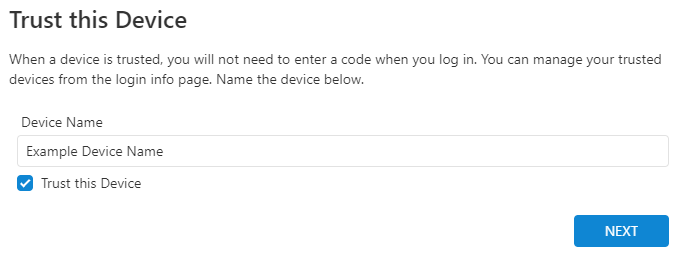
- Upon successful login, the user is prompted with a message asking if the device is a trusted device.
- If Trust Device is selected, then the Two Factor Authentication process is not started upon login for that specific device.
- If Skip is selected, the device remains an un-trusted device and requires a code to be submitted every time someone uses the device to log into that account.
Note: On the mobile app, the mobile device is automatically trusted upon the initial login with Two Factor Authentication. 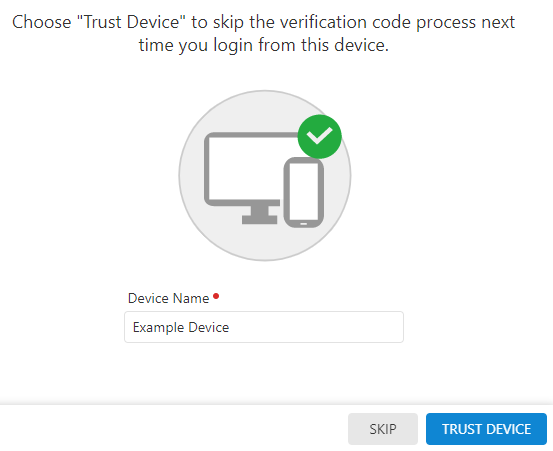
3. Lastly, the user will be presented with a list of any recognized devices that have been used to access their account recently and they will have the option to trust selected devices. The Two Factor Authentication process will not be required upon login for trusted devices.
To enable/disable Two Factor Authentication for a login using the website:
- Log into the website.
- Click Settings.
- Click Login Information.
- Click Two Factor Authentication.
- If disabling Two Factor Authentication, click Disable.
- If enabling Two Factor Authentication, select Text Message, Email, or Authentication app.
Note: Two Factor Authentication can be enabled for any of these options, but not more than one at the same time.
-
- If enabling Two Factor Authentication for text message:
- Click Next.
- In Mobile Number, enter the mobile number to receive the Two Factor Authentication confirmation code.
- Using the Country dropdown menu, select either USA or Canada.
- Using the Provider dropdown menu, select the cellular carrier of the mobile phone number.

Note: This displays the full list of Two Factor Authentication compatible cellular carriers.
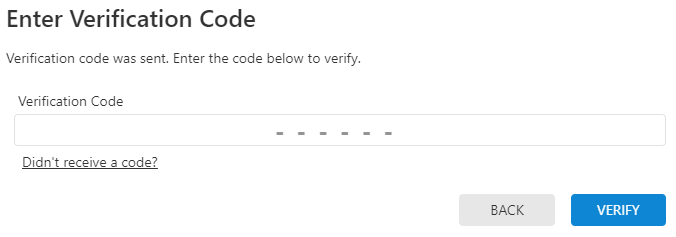
- Click Send to send a verification code to the mobile number.
- In Verification Code, enter the code that is provided in a text message to the mobile number.
- Click Verify.
- Click Next.
- If enabling Two Factor Authentication for email:
- In Send Verification Code, verify the correct email is displayed. For more information about how to update the email address, see Change an email address.
- Click Send.
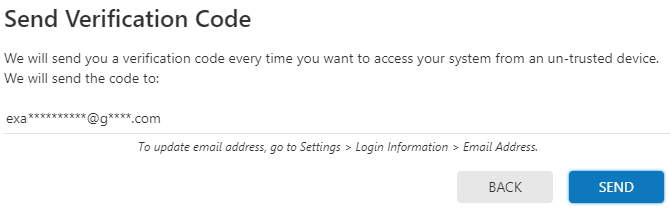
- In Verification Code, enter the code that is provided in the received email.
- Click Verify.
- If enabling Two Factor Authentication for text message:
Enabling Two Factor Authentication using an authentication app:
Important: A mobile device with an authenticator app is required to complete this process and the steps may vary based on the authenticator app in use.
-
-
- Generate an authentication code:
Note: The Duo authenticator app may experience unexpected behavior and it is therefore recommended to use an alternative authenticator app.
- Use a mobile device with an authenticator app to scan the QR code or manually enter the code provided on the Customer Website or app into the authenticator app.
- In the Enter Code field, enter the code that is generated on the authenticator app to verify the device.
- Click Next.
- Generate an authentication code:
-
- In Device Name, enter the desired name for the device that is accessing the account.
- If the device is trusted, click to select Trust This Device.
- If the device is trusted, click to select Trust This Device.
- Click Next.
- In Linked Devices, click Trust next to any additional devices that can be trusted.
- Click Done.
From the Website
- Log into the website.
- Click Settings.
- Click Login Information.
- Click Two Factor Authentication.
- Click
 next to the device name.
 - Make the desired changes:
- To rename the device, enter the desired device name, then click Save.
- To delete the device, click Delete Trusted Device, then click Confirm.
From the Mobile App
- Log into the app.
- Tap
 .
. - Tap Login Information.
- Tap Two Factor Authentication.
- Tap next to the device name.
- Make the desired changes:
- To rename the device, enter the desired device name, then tap Save.
- To delete the device, click Delete Trusted Device, then tap Confirm.
If you change your cell carrier or no longer have access to the phone number or email address that was set up with your Two-Factor Authentication, the feature must be disabled and then re-enabled with your new cell carrier, phone number, or email address. If you are unable to log in, it must be disabled by your service provider.
Updated on 06 Nov 2023