Looking for help?

Find answers to your questions

Frequently Asked Questions

Find Answers To All Your Questions

How to reconnect a camera to wifi

When your wireless settings or networking equipment change, the Wi-Fi cameras connected to the old network will disconnect from the internet. This is because they are still programmed with the old Wi-Fi information. Once the cameras have the new Wi-Fi information, they can reconnect.

Note: If your cameras are connected to an Alarm.com Smart Gateway, they will stay connected even if your network changes.

Prepare for a future network change

Let any service technicians know that you have a home security system that relies on your wireless connection. They can then be prepared to help you reprogram your cameras after the change if necessary. 


How to reconnect a disconnected camera to a Wi-Fi network

The website and app have built-in troubleshooting wizards that you can access to get personalized reconnection steps. For more information about how to initialize the wizard, see the Cannot View Cameras FAQ in this section.

For general steps, there are three possible ways to reconnect a disconnected camera. Access Point (AP) mode is the recommended method, but WEP mode or Ethernet may also be an option.


To reconnect a camera using AP mode:

Use a Wi-Fi enabled device (i.e., a smartphone, tablet, or computer) to connect your cameras to the network. Access Point (AP) mode functions by letting you connect to the camera directly and make changes to its Wi-Fi settings without the camera being connected to the internet.

  1. Press and hold the WPS/Reset button on the camera for 5 seconds. Release the button as soon as the LED starts flashing white. The camera is now broadcasting its own Wi-Fi network.
    Caution: Holding the WPS/Reset button too long (i.e., over 7 seconds), could result in the camera resetting to its factory default settings. The camera's LED will flash red and green to indicate it is resetting, after which the camera must be removed and re-enrolled on the account. 
  2. Use a Wi-Fi enabled device (i.e., a smartphone, tablet, or computer) to connect to the Wi-Fi network named ALARM:XX:XX:XX where XX:XX:XX is the last six digits of the camera's MAC address.
  3. Open a web browser on the device and enter the camera's Access Point web address (e.g., http://v723installhttp://522irinstall, etc.) or 192.168.1.1 in the address bar and follow the onscreen instructions.
    1. Click Scan for wireless networks.
    2. Click to select your Wi-Fi network.
    3. In Security Key, enter your Wi-Fi password.
    4. Click Save.
    5. Click Ok in the pop-up window that appears asking to refer to the website.
  4. Once the camera's LED is solid green, verify you can see live video on the Customer Website or app.


To reconnect a camera using WPS mode:

Use your router's WPS button to quickly reconnect your cameras to the network. WPS functions as a way for the router to share its Wi-Fi credentials with another device without the user having to enter the credentials. Both the router and the camera need to be in WPS mode at the same time for the camera to connect successfully.

Important: Some routers do not have WPS. If your router does not have a WPS button, or if the button is disabled (i.e., if the LED for the WPS button blinks red or does not light up when you press it), try using Access Point (AP) mode or Ethernet instead. For more details about whether WPS is available on your router, refer to the manufacturer's user manual.

  1. Press and hold the WPS button on your router until the LED starts flashing. Typically this button is labeled with the letters WPS, two arrows forming a circle, or a lock icon.
  2. While the router's WPS button is flashing, press and hold the WPS/Reset button on the camera for 3 seconds. Release the button as soon as the LED starts flashing blue.
    Caution: Holding the WPS/Reset button too long (i.e., over 7 seconds), could result in the camera resetting to its factory default settings. The camera's LED will flash red and green to indicate it is resetting, after which the camera must be removed and re-enrolled on the account. 
  3. Wait for the LED on the camera to turn solid green. This can take up to 5 minutes, and the camera might go through a few different LED patterns.
  4. Once the camera's LED is solid green, verify you can see live video on the Customer Website or app. 


To reconnect a camera using Ethernet:

Use an Ethernet (i.e., Cat5) cable to connect your camera directly to the router, then reprogram the camera's wireless settings using the website.

Note: Some cameras do not have an Ethernet port. If that is the case, try using WPS or AP to connect the cameras.

  1. Remove power from your camera.
  2. Attach one end of an Ethernet cable to the camera and the other end to your router.
  3. Power on your camera.
  4. Wait for the camera's status LED to turn solid green. This can take up to 5 minutes.
  5. Configure your camera's Wi-Fi settings. For more information about configuring your camera's Wi-Fi settings using the website, see the Change a video device's wireless network settings FAQ in this section.
  6. Remove the Ethernet cable and power cycle (i.e., remove power and then reapply it) your camera.
  7. Once the camera's LED is solid green, verify you can see live video on the Customer Website or app.

Change cameras wireless settings

You can change a video device's network information manually using the website while the device has power and is still connected to an active network with an Ethernet cable.

To change a video camera's wireless network settings:

Important: These settings can only be changed if the video device is connected to power and is currently connected to the internet with an Ethernet cable. 

  1. Log into the website. 
  2. Click Video.
  3. On the Video banner, click Settings.
  4. Using the Video Device dropdown menu, select the video device to edit.
  5. Click Wireless Network.
  6. To enter the new settings:
    • Click Smart Gateway to connect the video device to a Smart Gateway on your account if you have one.
    • Click Copy to copy the network information from another connected camera.
    • Click Scan to scan for, enter the Wi-Fi password, and connect the video device to a broadcasting Wi-Fi network.
    • Click Manual to manually enter the network's SSID, Wi-Fi password, and encryption type.
  7. To apply the new wireless settings to all the cameras on the account:
    1. Click Advanced.
    2. Click to select Apply these settings to all wireless cameras on this account.
  8. Click Continue to apply the new wireless network settings.

Adjusting Camera Brightness

The most common reason for your camera appearing washed out at night is due to the IR lighting in the camera reflecting off of objects that are too close to the camera.  To resolve:

  1. Confirm the camera does not have any large light colored areas within is field of view.
  2. Confirm that there is nothing to close to the camera reflecting the IR LEDs

Cannot View Camera

The Video Troubleshooting Wizard guides you through basic steps for bringing your video devices back online after they become disconnected. These troubleshooting steps include:

  • Power-cycling the video device
  • Power-cycling the router
  • Re-configuring wireless information

The Video Troubleshooting Wizard can identify the type of video device and provide device-specific advice depending on the situation. It can also detect and notify you when the device comes back online during the troubleshooting process. For more information about general troubleshooting for a disconnected video device, see the Change Cameras Wireless Settings FAQ in this section.

All Alarm.com video devices are supported by the Video Troubleshooting Wizard available on the website and app. The Video Troubleshooting Wizard is not available until a video device is offline for at least five minutes.


To access the Video Troubleshooting Wizard using the website:

    1. Log into the website.
    2. Click Video.
    3. Click Live Video.
    4. In the camera feed window of the malfunctioning device, click Troubleshoot.
    5. Click Get Started.
    6. Proceed through the wizard until the device is found and successfully connects.

To access the Video Troubleshooting Wizard using the app:

  1. Log into the app.
  2. Tap Video in the bottom menu. 
  3. Tap to select the video device.
  4. Tap Troubleshoot
  5. Tap Get Started
  6. Proceed through the wizard until the device is found and successfully connects.

There is a malfunction message on my system

Door Lock

  1. Verify the device is powered on.
  2. Verify the device is within range of the Z-Wave network. 
  3. Power off the device, if possible. Wait a couple of minutes, and then power the device back on. 
  4. Trigger the lock by manually locking and unlocking it. 

Thermostat

  1. Verify the device is powered on.
  2. Verify the device is within range of the Z-Wave network. 
  3. Power off the device, if possible. Wait a couple of minutes, and then power the device back on. 
  4. Trigger the thermostat by manually changing the temperature on it. 

Lights

  1. Verify the device is powered on.
  2. Verify the device is within range of the Z-Wave network. Try moving the light device closer to the panel, if possible. 
  3. Power off the device, if possible. Wait a couple of minutes, and then power the device back on. 
  4. Trigger the light device by turning it on and off manually. 

Viewing System Activity History

The system activity history shows system, website, and user activity that has occurred within the past 60 days. The system activity history is useful for accessing the information you need, storing key records, and gaining new insights for your system. 

Note: Extended activity history can be requested for commercial accounts, where commercial customers can request up to 12 months of account history. 

System activity history using the app

The activity history on the app is useful for viewing a quick summary of the recent activity for a system. The history on the app shows a maximum of 200 events. To view more than 200 events and use more detailed filters, view the activity history using the website.

To view the system activity history using the app: 
  1. Log into the app.
  2. Tap Activity in the bottom menu.
  3. By default, the last 25 events display.
    1. Tap  for iOS devices or Filters for Android devices to apply basic filters such as:
      • In Show, tap to select a specific amount of events to show or events that occurred during a certain timeframe (i.e., TodayYesterdayLast 7 days).
          Note: iOS devices can also select a specified date range for activity.
      • In Events, tap to select a specific event to display in the activity history. 
    2. Tap Apply once the desired filters are selected.


System activity history using the website: 

In addition to viewing and searching event history within the past 60 days, the following features are also available using the website:

  • Enhanced filters and search options that make it easy to access system information (e.g., filter by time of day, device types, activity types, etc.).
  • Export system search history results for analyzing the system and keeping records. 
  • View key system events using the Highlights feature. The Highlights feature provides a visual summary of key events in a compelling story format with short video clips and animated icons.
  • Quickly see groups of related events (e.g., when you come home, activity such as the garage door opening, system disarming, and lights turning on will be shown together).
  • Commercial-specific enhancements:
    • Filter by Business status (e.g., Opened on Time, business hour warnings, and Closed Unexpectedly).
    • Enterprise accounts will be able to see all of their Locations on the same Activity page, search for activity at specific locations, and perform quick comparisons of activity across two or more locations.
To view the system activity history using the website: 

Note: Only 1,000 events can be displayed at a time. If a filtered search returns more than 1,000 events, then more filters need to be applied to narrow the search.

  1. Log into the website.
  2. Click Activity.
  3. By default, the last 100 events are displayed on the first page and up to 10 pages of events can be accessed. Use the filters to narrow the results displayed. 
    • The activity displayed can be filtered by:
      • Using the Search bar to view activity matching specific keywords.
      • Using the Start Date and End Date to view activity within a specified timeframe.
      • Using the Users dropdown menu to view the activity of specified users.
      • Using the Device Type dropdown menu to view activity from specific devices.
      • Using the Event Type dropdown menu to view activity from specific events.
      • Using the Device Name dropdown menu to select events observed by specific devices.

Deleting system codes for security and door locks

Delete unused system user codes to keep the system secure.

Important: User codes cannot be deleted while the security system is armed. Verify the security system is disarmed before attempting to delete a user code remotely.


Delete a system user

Performing the following steps removes all of the user's information (e.g., associated email address, phone number, etc.) from the entire system. 

To delete a system user using the app:
  1. Log into the app.
  2. Tap Menu
  3. Tap Users
  4. Tap More for the user to be deleted
  5. Tap Delete Delete.
  6. Tap Delete to confirm that you want to delete the user and all of the addresses associated with it. 


To delete a system user using the website:
  1. Log into the website.
  2. Click Users
  3. Click More for the user to be deleted
  4. Click Delete Delete.
  5. Click Delete User to confirm that you want to delete the user and all of the addresses associated with it. 


Remove a user's security system access

Performing the following steps only removes the user's access to the security system but retains all of the user's additional information (e.g., associated email address, phone number, etc.). 

To remove a user's security system access using the app:
  1. Log into the app.
  2. Tap More Menu
  3. Tap Users
  4. Tap More for the user to be deleted. 
  5. Tap Edit Edit.
  6. Tap Panels.
  7. On the Device Access page, tap the toggle switch to disable the access points that the user code should no longer have access to.
  8. Tap Save.


To remove a user's security system access using the website:
  1. Log into the website.
  2. Click Users.
  3. Click More for the user to be deleted. 
  4. Click Edit Edit.
  5. Click Panels.
  6. On the Device Access page, click the toggle switch to disable the access points that the user code should no longer have access to.
  7. Click Save.

Creating and managing system codes for security and door locks

New system user codes can be created using the app or website.  

Important: User codes cannot be edited while the security system is armed. Verify the security system is disarmed before attempting to edit a user code remotely.

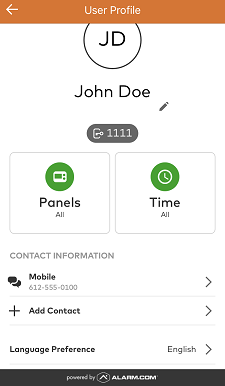
Create new system user codes using the app

  1. Log into the app. 
  2. Tap More Menu
  3. Tap Users.
  4. Tap Add.
  5. Enter the user's first and last name, and then tap Create
  6. In Access Code, enter the user's desired code. 
  7. Tap the toggle switch for the devices (i.e., panel partitions and locks) to enable/disable access for the user's code.  
  8. Tap Save. Allow a few minutes for the new user code to be active at the panel.
  9. To add user contact information, tap + Add Contact.
    1. Then tap either: 
      • Mobile Number. Enter the mobile number, and select the Country and Carrier using the dropdown menus. 
      • Email Address. Enter the email address, and select the Email Format using the dropdown menu. 
    2. Tap Save to add the new contact information. 

Allow a few minutes for new user codes to be active at the panel. 


User information app.png


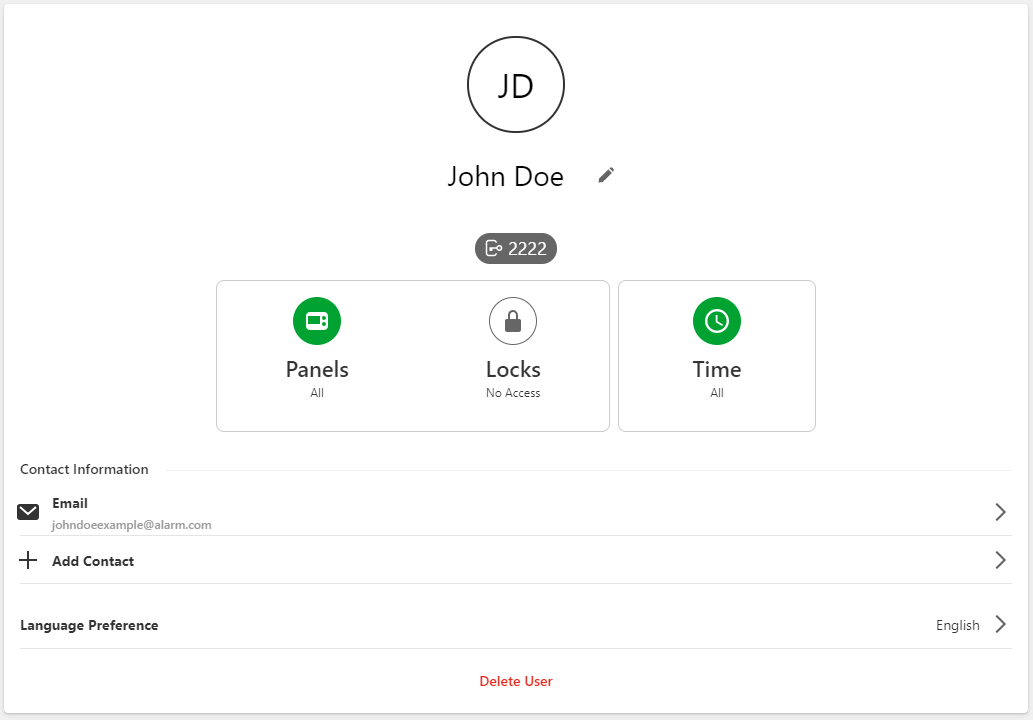
Create new system user codes using the website

To create new system user codes for single systems using the website: 
  1. Log into the website. 
  2. Click Users.
  3. Click Add New User.
  4. Enter the user's first and last name, and then click Create.
  5. In Access Code, enter the user's desired code.
  6. Click the toggle switch for the devices (i.e., panel partitions and locks) to enable/disable access for the user's code.
  7. Click Save. Allow a few minutes for the new user code to be active at the panel.
  8. To add user contact information, click + Add Contact.
    1. Then click either: 
      • Mobile Number to add a mobile number. Then enter the mobile number and select the Country and Carrier using the dropdown menus. 
      • Email Address to add an email address. Then enter the email address and select the Email Format using the dropdown menu. 
    2. Click Save to add the new contact information. 

Allow a few minutes for new user codes to be active at the panel. 
 

Create user on website

Setting up a new phone

When switching to a different phone for any reason, there are a few things to be aware of to ensure minimal disruption of your service. The following are suggestions for information and features that should be verified when swapping to a different phone. 

Primary phone contact 

When swapping to a different phone that was associated with the primary login, the primary phone contact on the account should be updated if the number is different. This ensures that the primary contact is up to date in case the primary contact needs to be reached for any reason.

For more information about how to update the primary phone contact, see Change a phone number.


Rules and notifications 

The rules and notification on the account should be updated to reflect any phone swaps that are performed. The new phone should be added to the contact recipients for any desired rules and notifications, and the old phone should be removed from any rules or notifications. This ensures minimal disruption in system usage and notifications. 


Alarm.com Geo-Services 

When swapping to a different phone, update the list of Geo-Devices that are attached to the account. In this case, delete the old phone from the Geo-Devices list on the account and add the new phone to the list. 

For more information about how to configure Alarm.com Geo-Services, see Using Geo-Services.


Two Factor Authentication  

When changing phones, the contact information associated with Two Factor Authentication needs to be updated if the feature is enabled for the user's account. To update the contact information that the Two Factor Authentication feature is associated with, disable and then reenable the feature. 

For more information about how to enable and disable Two Factor Authentication, see What is Two Factor Authentication?.

Change the name of a camera

Video device names can be customized for easier system management using the customer app and customer website. 

To change a video device name using the customer app:

  1. Log into the customer app.
  2. Tap Video.
  3. Tap Manage Devices.
  4. In Video Devices, tap More next to the video device to be edited.
  5. Tap Rename Device.
  6. Enter the new name.
      Note: Camera names can have a maximum of 16 characters each.
  7. Tap OK.


To change a video device name using the customer website:

  1. Log into customer website.
  2. Click Video.
  3. Click Settings.
  4. Using the Video Device dropdown menu, select the video device to be edited.
  5. Click Video Device Info.
  6. In the Video Device Name field, enter the new name.
      Note: Camera names can have a maximum of 16 characters each.
  7. Click Save.

Changing Account Information (Address, Email, Phone Number)

To change the primary account phone number using the mobile app:

  1. Log into the mobile app.
  2. Click MORE in the bottom menu.
  3. Click Account Management.
  4. In Account Information, click EDIT.
     Note: If unable to edit this information, contact your service provider.
  5. Enter the new information in the appropriate field.
  6. Click Save.


To change the primary account phone number using the website:

  1. Log into the website.
  2. Click Settings.
  3. Click Account Management.
  4. In Account Information, click Update Account Information.
     Note: If unable to edit this information, contact your service provider.
  5. Enter the new phone number in the Phone Number field.
  6. Click Save.

Create a new login

Change a Login Name

Delete a Login

Deleting unused website and app logins help keep the system secure. Secondary logins can be deleted using the website.

To delete a login using the website:

  1. Log into the website.
  2. Click Users
  3. Click Manage Logins.
  4. Click Delete for the login name to be deleted.
    • If the delete option does not display, your login may not have permissions for login management. Contact the user with access to the primary login to remove a login. 

 Note: The primary login cannot be deleted and deleted logins cannot be recovered. If the primary login name or email address needs to be updated, see Change a login name or Change an email address

Changing the email address associated with an account

Keeping the primary email address updated on your account helps keep your system secure.

Important: The email address of secondary logins cannot be changed once created. Delete the secondary login with the incorrect email address and create a new login with the correct email address. For more information about how to delete secondary logins, see Delete a login.


To change the account primary email address using the customer app:

  1. Log into the customer app using the primary login of the account.
  2. Tap MORE .
  3. Tap Login Information.
  4. Tap Email Address.
  5. Enter the new email address in the Email Address field.
  6. In the Current Password field, enter your current password.
  7. Tap Save.

To change the account primary email address using the customer website: 

  1. Log into the customer website using the primary login of the account.
  2. Click Settings.
  3. Click Login Information.
  4. In Login Information, click Email Address.
  5. Enter the new email address in the Email Address field.
  6. In the Current Password field, enter your current password.
  7. Click Save.
Added Cart Error